
Never overlook a random snapshot! That is what most of my images are to begin with.
This one was snapped in our bedroom in front of a closet in quite a poor light. There is a huge difference between the before and after - especially in the mood in the image.
There are all kinds of things you can do but I find texturing one of the easiest and by far the most effective way to turn an image into a nice piece of portraiture art.

Here is my editing step by step in Photoshop Elements. Keep in mind that textures are easy to work with in any editing program that allows you to use layers. I used a free editing program 'Gimp' for long before started to learn Photoshop. If there is enough interest, I might provide a texture tutorial for Gimp as well...
But let's take a look at the before and after images...
But let's take a look at the before and after images...

Before...

...after!
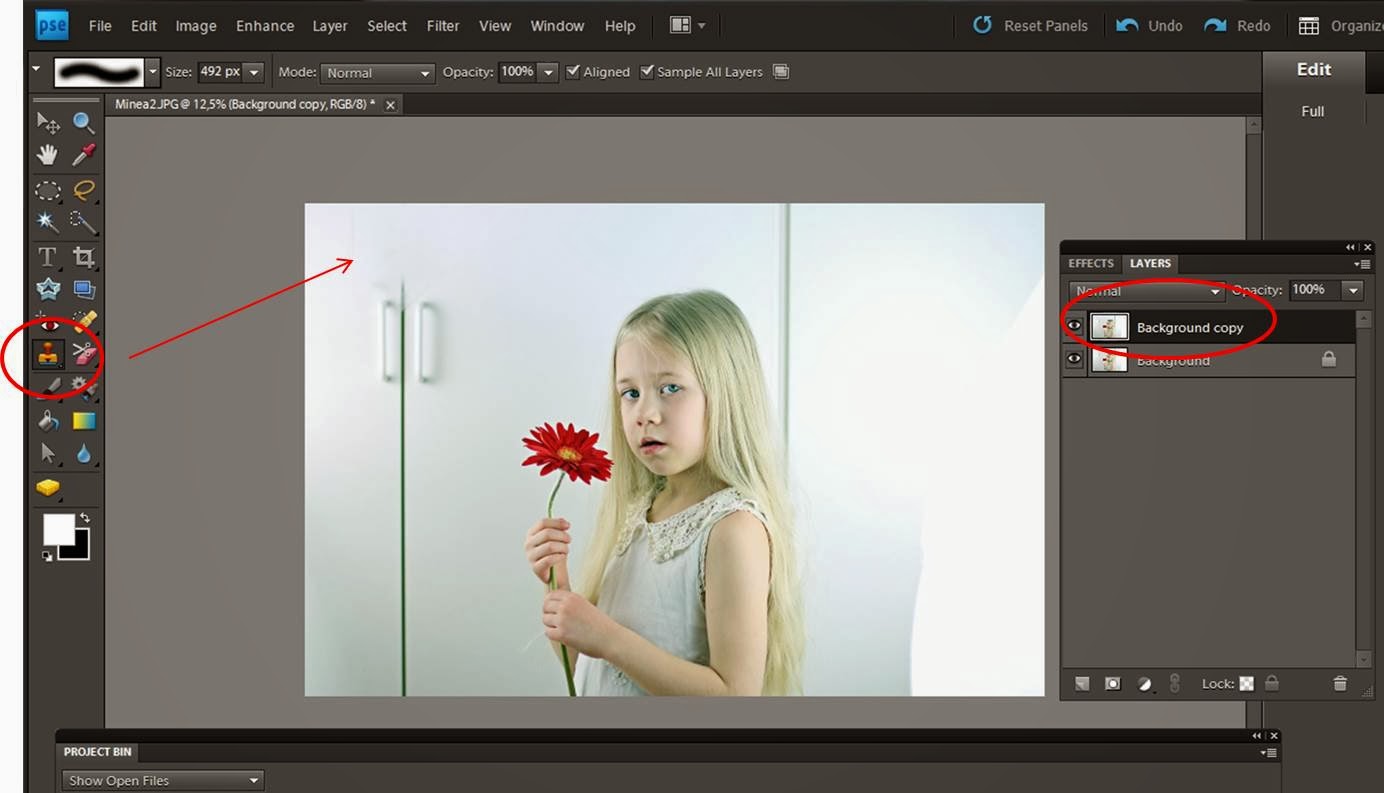
The first step is to remove the closet outlines by using the Clone Stamp Tool that allows you to copy one area of an image and copy it onto another area. First select the area you want to copy from and click Alt-click (for Windows). Then move your cursor to the are you want to replace and simply click.
This a very useful tool but it might require some practicing before you get the idea completely.
This a very useful tool but it might require some practicing before you get the idea completely.
Once I'm done with the background I move on and I try out some Photoshop Actions. I use actions a lot! I wish I could edit like I didn't need them but I can't. Actions are great to improve ones photography and save editing time. If you are looking for good actions but don't know where to start looking I advice you to visit Florabella Collection and Paint the Moon. Those are the ones I use and I couldn't love those actions more.
In the picture below I have run two actions from Florabella Colorplay action set.
Brownish & 1975. They make a huge difference in the picture - nice soft, dreamy and shabby look.

Then it's time to texture! I've chosen Kim Klassen 'Marabella' -texture slightly desaturated.
If you need help desaturating / removing colors from the texture, I have a tutorial for that - just click here! Place the texture above the image, resize to fit and choose your blending mode and opacity. Here the texture is applied with Multiply blending mode 52% opacity.

I wanted to remove the texture from my girl, so I added a layer mask.

I used rather large black soft brush at 61% opacity to mask of the texture in desired areas.

In the very end I added some light to the center of the image and some vignettes.
For both I have actions from Florabella Collection.

And here is the final image.

And another two outtakes from the same session.


Thanks for reading! Should you have any questions, do not hesitate to contact me :)
♡
♡
Sharing with: Favorite Photo Friday, Weekly Top Shot,
In the picture below I have run two actions from Florabella Colorplay action set.
Brownish & 1975. They make a huge difference in the picture - nice soft, dreamy and shabby look.
Then it's time to texture! I've chosen Kim Klassen 'Marabella' -texture slightly desaturated.
If you need help desaturating / removing colors from the texture, I have a tutorial for that - just click here! Place the texture above the image, resize to fit and choose your blending mode and opacity. Here the texture is applied with Multiply blending mode 52% opacity.
I wanted to remove the texture from my girl, so I added a layer mask.
I used rather large black soft brush at 61% opacity to mask of the texture in desired areas.
In the very end I added some light to the center of the image and some vignettes.
For both I have actions from Florabella Collection.
And here is the final image.
And another two outtakes from the same session.
Thanks for reading! Should you have any questions, do not hesitate to contact me :)
♡
♡
Sharing with: Favorite Photo Friday, Weekly Top Shot,
Ihania kuvia ja kuvanmuokkaukset :)
ReplyDeleteHello Mona,
ReplyDeletethank you so much for these informations.
Very helpful for beginners like me!
Does the clone stamp tool in PS CS6 work as well as in PSE?
I did not use this tool so far. I always had problems with the backgrounds and it always bothers me...;-)
So I will try it out. What exactly is the difference between PS and PSE?
Hope you have a wonderful weekend,
now we have snow too...
Brigitte
Just send you a mail... hope it finds you well :)
DeleteDivine shot and excellent photo editing 'how to' ~ thanks,
ReplyDeletecarol, xxx
www.acreativeharbor.com
Wow! That's an amazing difference. Thanks for sharing.
ReplyDelete